Velociraptor Haunted House Prop Pages: 1 2 3 Next>>
Velociraptor Prop - Page 2
Velociraptor Prop Details - The Teeth
The Lower & Upper Velociraptor Jaws, The Skull Drawing and the Teeth
Now we come to the most important part of such projects - the finishing
details. These are used to hide some of the imperfections and give the
final product a more polished look. In my project, the details included
the eyes, fingernails and teeth.
Randy recommended using Sculpy for the teeth and I decided to use it for the nails as well. It dries in your oven and proved to be the perfect material for these details, giving the project a polished look. The eyes had been planned as ping-pong balls all along.
This is how the dentist does it, right?
The teeth were actually sculpted early on in the project. They were indivudally designed for the upper and lower jaw using a reference photo
of a raptor skull (you can just make it out in the photo above). Each tooth was then numbered for easier insertion once all the gooey phases were complete.
I pre-drilled the holes
for the teeth (see right), but during the various phases on constructing the velociraptor body, the holes became full of resin, glue, paint
Velociraptor Plus Dentures.
and other gunk and had to be re-drilled. The raptor was surprisingly calm during her
oral surgery.
Once this was done, it was a simple matter of installing the teeth into the drilled holes. I had embedded short drywall screws into the sculpy when I was making the teeth so that they could be screwed directly into the wooden skeleton that made up the mouth.
I then repainted the Hot Pink Model Magic with a lighter coat of pink. Her tongue had an odd, inflamed look before I did that that.
Velociraptor Prop Details - The Hand and Toe Nails
The Extendable Claws Before Being Painted
The extendable claws on the back feet were installed during the construction of the body of the prop. I knew that there were models of genuine raptor claws available on the web, so I purchased
life-sized Utahraptor claws for my model. I wanted Utahraptor claws
because they were larger and would give me more material to work with. I got them from a company called shipdino.com - they were great people to work with.
Velociraptor Finger & Toe Nails
For the finger and toe-nails (other than the extendable claws), I created
black Sculpy version to match my model. Like the teeth, each nail was numbered according to
its location since I had fitted them to the finger/toe before baking the Scuply.
The Roofing Nails in the Hands of the Velociraptor
I drove roofing nails into her fingers and toes and glued them in place to help
secure the nails to the framework. This where the duct
tape proved to be a less than optimal artistic medicum because the glue didn't stick to it very well.
The final claws and both feet turned out pretty well. Most importantly, they covered up the ragged ends of the duct tape-wrapped fingers and toes. I used Black Max glue to try and keep them on, which worked for the duration of the haunted house.
The Velociraptor Prop's Hands with the Fingernails Mounted On Them |
Velociraptor Prop - Final Assembly
The Toy Used for Dimensioning
Velociraptor ACAD Drawing
After all that was done, it was time to test assemble this monster!
As mentioned, the back of the prop was left open for the Haunted House so that we could mount the prop to a pulley system. (Of which, unfortunately, there are no photos.) The cable for the pully was mounted high on the wall at the back of the haunt and sloped down so that the prop would rush forward when released and smash through a breakaway wall.
The tail was not to be included in the haunt because of the space I had to work with. Plus it wouldn't be seen anyhow.
I brought the legs with me to the haunted house, but they turned out to be unnecessary as well. You could make a convincing argument that there was really no reason to do that tail or feet at all, but I wanted to make the prop entire, so I made all the other parts of it with the idea that I would do something with it after the haunted house was over.
The
The Velociraptor Prop Sans Limbs and Tail. (The 2x4 at the Back is to Hold the Tail.)
other nice thing about having the back open was that it allowed me to remove as well as tighten and loosen the arms and legs. Technically they could thus be repositioned, but there was really no need to do that for the haunted house. I wish I had thought more about the joints, though. They tended to slip over time (especially after she crashed through the fake wall a couple hundred times.)
Removal of the limbs was also important because I had to transport the thing about 35 miles to the Haunted House in my pickup. Fortunately, when the limbs were removed, it sat (relatively) flat in the truck bed.
Holding the Velociraptor Prop Up While She is Attached to the Wire
Setting the thing up at the Haunted House was a bit of a trick. We were in an old movie theater with at least twenty-foot plus high ceilings, so there was lots of vertical space to work with. Unfortunately the walls were old plaster, so finding something solid to anchor the cable into was a bit of a trick. We managed to do it, although the raptor had to come at the wall at an angle, making it a little tricky for the operator. The cable also needed to be tightened occasionally as all that up and down motion made it sag over time.
The velociraptor survived the repeated pull/release process pretty well although there was some minor damage to the fiberglass and paint. I wanted to keep it, but I had to figure out what to do with it. (It was 12 foot long!) Plus, while I liked the prop, there were some elements I wanted to change...
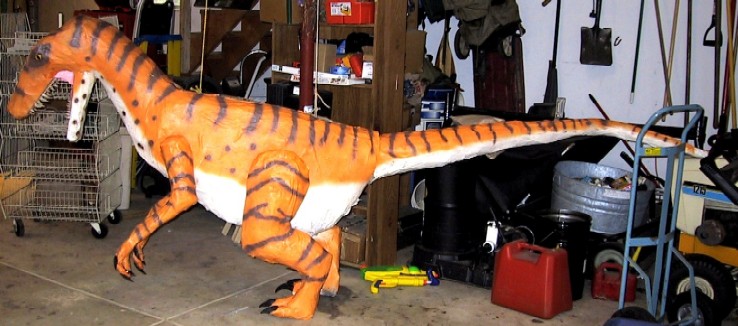
 The Finished Velociraptor Prop - For the 2004 Wyandotte Jaycees Haunted House |
