
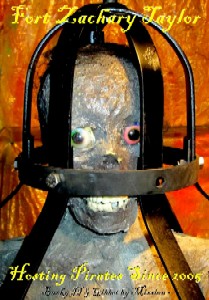
Bucky II and the Steel Gibbets
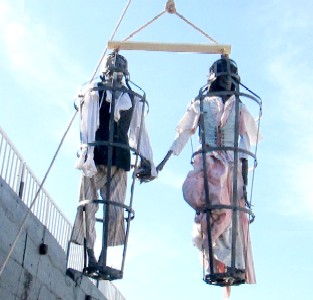
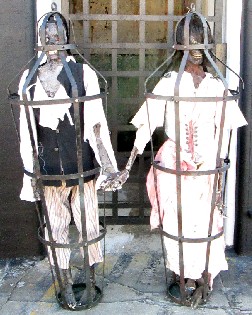
Bucky II & Becky in Paradise. (It's romantical.)
Bucky II is the follow up to the first gibbeted Bucky corpse that I created for the Fort Taylor pirate event in 2008. My original vision for the gibbeted skeletons was to work with other horror prop creators to make a half dozen or so to line the path that goes from Fort Zachary Taylor to the battlefield. However, purchasing and shipping these things down to the fort proved to be expensive and no one else seemed inclined to make them, so I decided on building just one pair - a male (Bucky) and a female (Becky).
Unfortunately, the only year both of them were in the fort at the same time was in 2009. Bucky had already been hung up by the time I got Becky ready. So while she was there, she remained on the ground, not hung next to her mate. The next year, Bucky disappeared from the fort and Becky wasn't hung at all, so neither appeared. After that gibbeted skeleton hiatus, Becky was hung without her dress in 2011. (I asked that this not be done again since the skeleton wasn't fully skinned and it looked really strange). The dress was restored in 2012. But she still looked odd. Why would there only be a gibbeted female in a pirate camp? There was always meant to be a skeleton couple.
So I vowed for 2013 to create a Bucky II, which is the roundabout way of getting us to this article. I actually came up with the idea that they be holding hands, which I thought would be romantic. Why shouldn't Becky moulder away her after-death years with a partner?
Creating Bucky II - Clothes
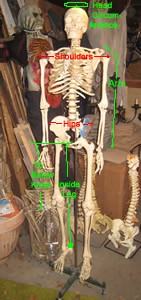
Bucky II Measurements
Bucky II began with a call to members of the folks who had attended the Fort Taylor Pyrate Invasion in 2012 for clothing. My creative energies run in a particular direction which, unfortunately, does not include sewing. Michael & Kate Bagley had made both Bucky I and Becky's clothing and it seemed unfair to ask them to create clothing for Bucky II. So I posted this request on the FTPI Facebook page:
"Does anyone have any cast-off, worn-out, very small clothing they'd be willing to donate to the making of a mate of the gibbeted female skeleton prop (Becky) at the gate? She used to have a mate called Bucky which I donated to the fort in 2008, but he got lost and now I want to make a new one for 2013.... So if you have some old clothing LMK. Becky needs a mate."
I

Bucky II in Reuben's Shirt
suggested that since Bucky was nothing but bones, "the sizing can be very, very small... These skeletons are about 5' tall and size 0 women's clothing would fall off them." This was apparently not enough information, however, so I measured him up and posted the measurements. They were as follows (for those of you needing lab skeleton measurements in the future):
Head - 20" around
Shoulder - 36" around (circumference)
Arm - 22" long from shoulder
Hips - 25" around (circumference)
Inseam - 28" to foot/16" to below knee
Foot - 9" long
Overall Height - 5' exactly
This seemed like it might confuse everyone reading, so I added the picture
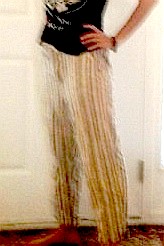
Shana Modelling Bucky
II's New Slops
you see above right.
Angelina Morgan and my twins each responded and agreed to make or donate a piece of clothing for the hapless skeleton. Angelina sent along her husband Reuben Morgan's old shirt and twin Shana sent me a pair of her old slops. (Yes, they fit Bucky II quite nicely.)
Poor twin Jana wound up having to make a waistcoat for him. She wanted to send me one she already had but it was a bit girly and flamboyant for an executed pirate. I told her to machine sew it as no one would be looking very closely at it, which she did. Jana reported, "The waistcoat is just a little small on me, so it should fit him fairly well." Again, it fit Bucky II quite nicely.
The only problem with the waistcoat was that it was brand new when I received it. So I put it and everything else I had received in a bucket of muddy water and then left them there for a couple weeks. This worked wonders on the shirt and slops, but not so well on the new waistcoat. To try and batter it up a bit, I included the waistcoat in every single load of laundry for three months. I won't say that I got it quite to looking careworn, but it was definitely a little worse for the wear. (Which, in this case, was a good thing.)
Creating Bucky II - The Body
Taping up
the mouth & eyes to protect them from the paint.
Now I had to put together Bucky II. I began as I have with both of the other members of his family: an articulated 4th rate 'Bucky' skeleton. (This where he gets his name. Becky's name was sort of a joke. She is actually not a Bucky skeleton at all, she is a regular lab skeleton which cost me three times as much as the Buckys do. But, unlike the Buckys, she IS a female, which is why I dressed her so.)
Like Bucky I and Becky, the skin on the skeleton was created using liquid latex and toilet paper over painter's tape. This is my 'go to' decrepit, mummified skin material. (I use painter's tape in case I want to remove the skin.) A little deft pricking with a pointed and hooked ceramics tool and he had nice mottled-looking skin. (I use the term 'nice' here loosely.)
The real work in making it look realistic is in the painting. Unfortunately I waited a bit longer than I usually do to start this project, so it had gotten cold. This meant that the painting had to be a bit more quick and dirty than Bucky I and Becky because I only had two warm days to get it done.
Before I could start painting, I masked his teeth and eyes with painter's tape as you can see at left. (He looks really odd with the painter's tape on his eyes and teeth to me.)
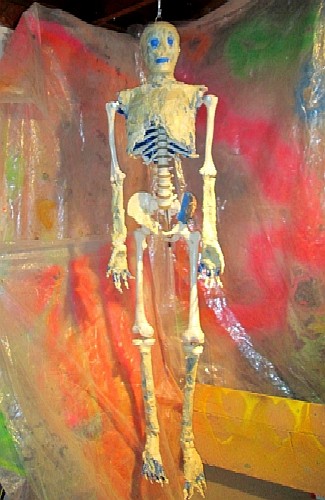
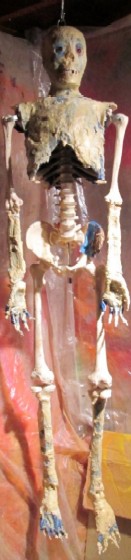
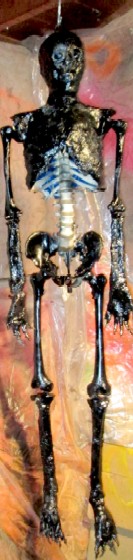
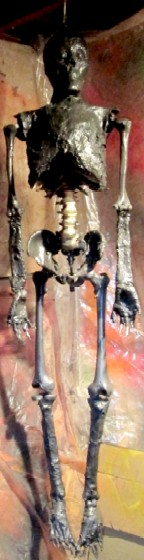
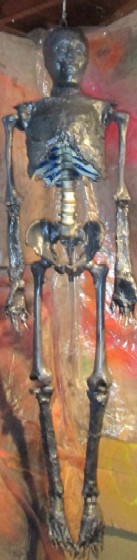
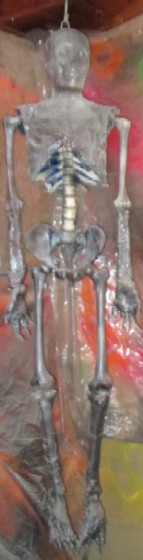
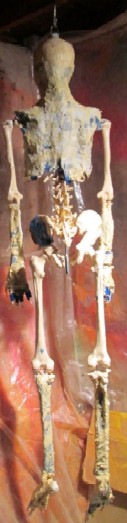
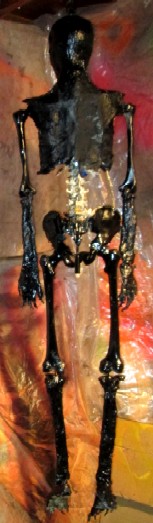
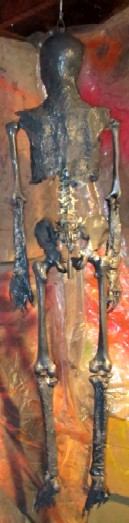
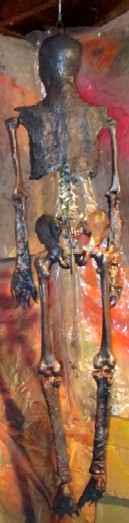
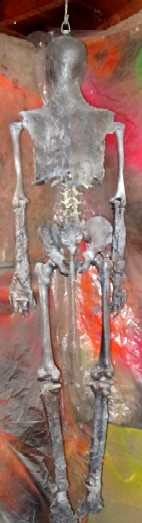
The paint stages can be seen in the images below - front then back. The first image in each series is the liquid latex coat. The second is black paint. I like to start with the dark colors first and build up into the lighter colors. I would say that this is so that I can better highlight things, but I am using regular old cans of spray paint, so my ability to target the paint is a bit limited. The third image shows dark brown. The fourth is a light brown layer and the last is a light grey. This is sort of misted on instead of painted to better allow the darker colors to show through..
 |
 |
 |
 |
 |
 |
 |
 |
 |
 |
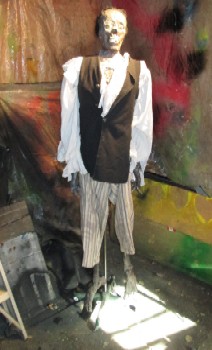
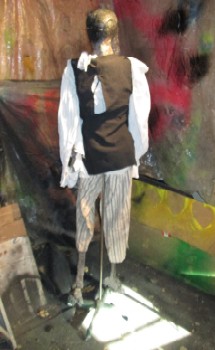
Bucky II Dressed (Front) (He looks
like he's about to give a speech.)
Once the paint dried, I removed the tape and cleaned up the eyes and teeth so that no paint, tape or liquid latex was on them. Next I needed to give him hair.
I had cut apart a wig to create Bucky I's hair and I'll admit that I never liked the look of it. Once it was glued to his skull there wasn't much I could do about it, however.
Rather
Bucky II Dress (Back)
than duplicate that mistake, I decided to try something different for Bucky II's hair - something new to me. I got some fake Halloween spider webbing and painted it dark brown. This actually worked out very well. First I teased the spiderweb into a thin net and then I spray painted it. Then I took the still wet spider webbing and pressed it onto Bucky II's head. When it was dry, it was stuck there quite well!
I got the idea for this type of hair while working on my Skeleton Garden Haunt. (Incidentally, if you are wondering about the backgrounds in the production photos, Bucky II was painted in the makeshift paint booth I created in my garage for painting the Skeleton Garden props.) In fact it worked out so well that I believe I will use it in the future if the opportunity to make another rotting skeleton arises. (And, in my world, that is entirely likely.)
The last step was to dress him and apply a few strategic tears to the clothing to show off the skin. While he doesn't look quite as grisly as Bucky I, he looks more realistic to me.
The Steel Gibbets

Cannibal Chrispy Holding
Becky's Plastic Gibbet
Like the missing Bucky I's hair, Becky's gibbet had annoyed me. I purchased plastic gibbets for the princely sum of $130 apiece and they proved not to be up to the task. They were clearly not made for regular use and they started breaking and splitting. Michael Bagley had to repair Becky's gibbet after 2 or 3 events using strips of wood. This worked reasonably well, but it looked odd.
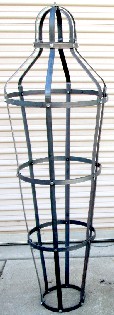
I wanted to make steel gibbets. I work with a lot of fabricators and machine shops and it seemed like this should be something I could do. One of our vendors - Bob Kokal - likes interesting projects, so I presented this to him. He agreed to give it a shot. So I drew the gibbet up in Autocad (seen below) to give him a template to work from. Of course, it's one thing to draw a gibbet in a mechanical drafting program, it's another thing to make it. He told me he would have to weld them near the top, but he could do the rest of it by bending and forming. Bob did wonderful work. On top of that, because he liked the project so much, he donated his time since I was donating the gibbets to Fort Taylor.
By the time I had retrieved the gibbet parts Bob had made and gotten ready to work on them, we were well into Michigan's fall. Rather than fight with them in my unheated garage, I took them to my company's workshop to assemble them. (There is nothing quite like trying to handle and work with cold steel.) People at work are pretty well used to my odd projects so I didn't get too many comments about them being there.
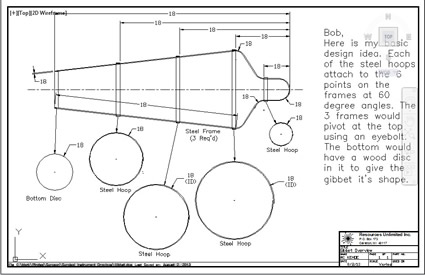
The Autocad Drawing of the Gibbet I made for Bob
I had one problem, though. I had intended to make the bottom of the gibbet out of wood. Bob did not realize this and had made a hoop for me. Since I didn't really have the right tools to cut a neat round wooden disk out anyhow, I decided to use the hoop. Another vendor of ours - Justin at Double Dee Welding - put three bars across one side of the bottom disks for me. It actually looked far cooler that way because it showed off the skeleton's rotted feet. (Well, I thought it looked far cooler. YMMV.)
My next task was to drill all the holes that held the rings to the gibbet sides. Drilling the rings wasn't too difficult because I could set up the drill press in our shop to handle them. To figure where to put the holes, I carefully clamped the rings (one at a time) where they were to go on the gibbet's steel side pieces and marked the holes with a punch. When all six holes were marked, I took the ring to the drill press and drilled it. It sounds easy, but it took hours to do.
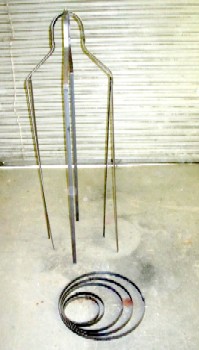
The Gibbet In Parts
Once that was finished, I had to put the rings back in exactly the same position I had marked them. This was because, despite my best efforts to make them uniform, the holes were all custom drilled and so not perfectly aligned. I reapplied the spring clamps to hold the rings in place and drilled through the ring holes into the gibbet's sides. I installed the bolts to hold the gibbed together for the trip home where I planned to paint them. (They were raw steel and if they weren't painted would rust. Ironically, I was going to paint them with rust effects. Ahem.)
The first step of painting was to mark the gibbets so that I could put the rings in the exact same position when I got them down to Key West. (They couldn't be shipped assembled.) So I painted a square piece around one the holes on one of the upright gibbet sides (red for one gibbet, yellow for the other - in addition to aligning them properly, the rings had to stay with the uprights for which they had been drilled.) Next I painted a square piece around the inside of the ring hole that matched the side that had been painted. That way the ring would cover the painted patch on the upright when the gibbet was assembled. I then disassembled the gibbets, put tape over the yellow and red
Rust Effects and Spikes
parts and painted everything black.
As a final step, I added little spike covers to the nuts that were holding the gibbet together on the inside. I borrowed this idea from the old plastic gibbets. They had come with plastic spike-shaped nut covers to disguise the hex nuts and give the cage a more fearsome quality. I bought a bunch of push on chromed spike lug nut covers from Empire Chrome Shop. (In fact, I bought a lot more than I needed. I forgot that I didn't need them on the bottom.) I painted the lot of them black and then reassembled the gibbets. I put the spikes on the nuts part way (since they are difficult to remove once fully pressed on and I needed to disassemble the gibbet.) Next came the painting of the rust effects.
I decided to rust gibbet one more than the other, mainly because the rust effects are a lot of work. (As you might guess, the rustier one was the one I began first before I realized how much work an extensive amount of rust was going to be.) As I had done with the gibbets for Bucky I and Becky, I used the Faux-Painting website instructions for creating rust effects. The metal already had a nice rough quality to it, so I skipped the sand step. Other than that, I followed the instructions, creating spots of rust, particularly where separate pieces of metal came in contact with each other. Voila! Rusty Gibbets! That completed this part of the project.
 Raw Steel Gibbet |
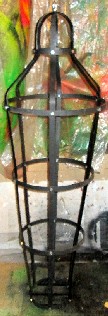 Painted Black |
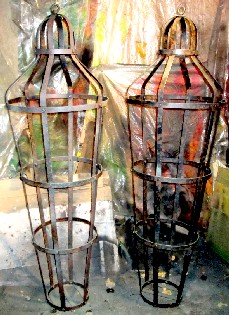 Both Gibbets with Rust Effects |
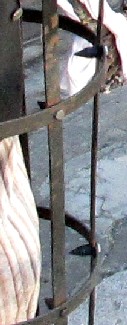
 Final Gibbets With Rust Effects and Spikes |
Getting Bucky II and the Gibbets to Key West
Something I Made Up for Event
Attendees on Facebook
Just because the gibbets and Bucky II were done didn't mean that the job was done. Not by a long shot. I still had to get all this stuff down to Key West for the Fort Taylor Pyrate Invasion.
I don't know about you, but I tend to lean towards optimism when considering how much something will cost, how long it will take or how little it will weigh. This particular project encompassed all three of these mistakes when it came to shipping.
For some pie-eyed reason, I thought I could put the gibbets into one box and the skeleton into another and ship them UPS. That did not happen.
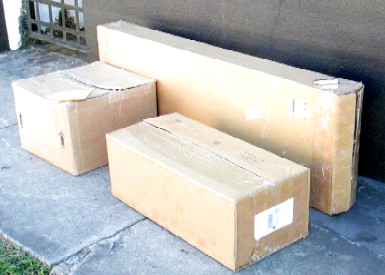
This is what $200 of UPS Shipping Looks Like (In Case You Wondered)
First, the gibbet weighed too much to ship via UPS. I toyed with the idea of sending everything in box via freight. The problem here was where I could ship to. It had to be a place that could handle freight (tractor trailer) deliveries. In a panic, I contacted Leigh Collins, one of the event organizers. She set me up with Liquid 8 Pawn Shop in Key West. Theo, one of the Key West-based pirates, worked there and could handle freight.
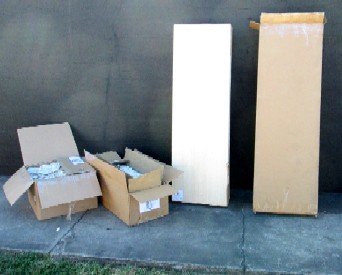
In the mean time, I started brainstorming about other ways to ship this and came up with the idea of sending the upright frames in one box, the hoops and the skeleton legs in another and the tools, fasteners (nuts and bolts) and the Bucky II body in a
The Kind of Action-Packed Photos You Expect in These
Articles. Note the tall Wood and Cardboard Boxes
third box. That got me under the UPS weight limit. Just barely. I made a wooden box that fit inside a double walled cardboard box for the legs and hoops because they weighed too much for a regular cardboard box. The body and parts went into a box within a box. The uprights... they were almost too long to ship UPS. I carefully made a light-weight wooden box and took it to a custom cardboard box-making company to have a double weight cardboard box made for the wooden box. It just barely slithered under the UPS size shipping limits.
$200 worth of UPS shipping later and Bucky II, his parts and the set of gibbets were on their way to Key West! Everything arrived safely and was waiting for me when I got there. My friends (the Mercury crew) helped me assemble them which is a whole story unto itself. Since I have already told that in my Journal for the event, I will let you read that tale on the 2013 FTPI Surgeon's Journal if it interests you.
I leave you with some photos of the assembly and mounting of the gibbets at the fort.
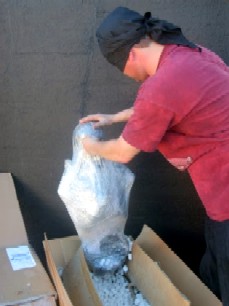 Photo: William Pace Photo: William PaceRemoving Him From Peanut Hell |
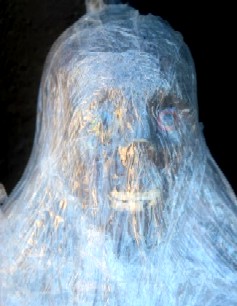 Photo: William Pace Photo: William PaceVacuum Sealed For Freshness! |
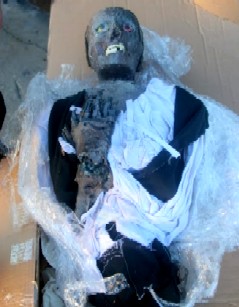 Photo: William Pace Photo: William PaceIt's Like Christmas, Only Horrible! |
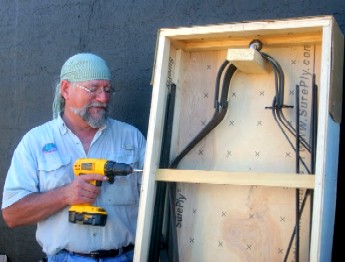 Photo: William Pace Photo: William PaceCaptain Jim Removing the Supports from the Large Box |
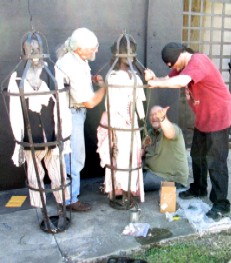 Photo: William Pace Photo: William PaceThe Mercury Crew Working on the Gibbets |
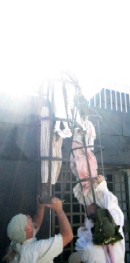 Photo: Mission Come Into the Light! |
Main Page • Tools & Procedures • Miscellanea • About the Author • Facebook Page
All original content copyright M. Kehoe • 2003-